All posts by Miles

How to Use Zebra OneCare

We’ve written this short guide to using Zebra OneCare so you know what to do if your label printer stops working. 

If you have visited this page you probably know what OneCare is, but just in case you don’t:

  • Zebra OneCare is service and support for Zebra hardware. 
  • You buy cover when you first buy your printer.
  • There are a number of repair options – next day replacement printer, on-site repairs or return to workshop.

Finding your way around Zebra’s website isn’t easy so we’ve written this simple step-by-step guide to help.

1. Visit https://supportcommunity.zebra.com/

Part-way down the page you’ll find these tiles

Zebra Support Community Screen

2. Choose Request a Repair

3. Choose the Repair Request Form

4. Initiate a repair.  You’ll be asked for the printer serial number and if the printer has OneCare cover this will initiate the repair process with Zebra.  

Depending on the OneCare cover you have, you’ll be sent an engineer or a box (to put your faulty printer into).

Useful Links

Visit the Zebra website to find out about Zebra’s OneCare program – click here.

Last Updated: 20 Jul 2022

How to Print Labels with NiceLabel

NiceLabel is a hybrid labelling system with cloud storage for label designs and a PC-based design and test print element.  NiceLabel is one of the leading labelling systems alongside Seagull Scientific’s BarTender.  Established in 1993, the company has been around for more than 25 years, has more than 100 employees and was recently bought by the global software company Loftware. This article will show you how to print labels with NiceLabel.

We’re going to cover:

  • Getting NiceLabel
  • What you get when you download it

Let’s look at how you can get started printing labels with NiceLabel.

Starting with NiceLabel

First – visit the NiceLabel downloads page here and download Designer and Desktop Solutions

Loftware, NiceLabel’s publishers, requires you to talk to us before you gain access to the NiceLabel Cloud.  You’ll receive a demo to understand how to use it before getting a demo account to trial it.  Call us on 01359 271 111 or email info@expertlabels.co.uk to get started with NiceLabel Cloud.

Once you have your NiceLabel login, this is what happens.

NiceLabel Cloud

NiceLabel Control Centre

Log in to NiceLabel control centre.

Use the web-based Nicelabel control centre to manage, print, analyse and store your labels.  You can also approve label designs for printing in the control centre.

From the NiceLabel control centre, you’re able to download the web printing client and label designer software.  Download the Web printing client – the software that enables you to print directly from the cloud.

NiceLabel Designer

Use NiceLabel Designer to design and print labels. 

The designer is PC based. Please note, NiceLabel is not available for Apple Macs at the moment.

On your browser visit the NiceLabel downloads page here and install the local elements of NiceLabel. You can also find these apps in the NiceLabel control centre. 

Download the label design component of NiceLabel.

NiceLabel Powerforms

Once it’s downloaded, open NiceLabel Designer and activate your licence.

Use Designer to design and test print your labels. Once you’re happy, save the labels. You have a choice where to save them – locally or in a cloud folder.

I designed a label using the Nicelabel Designer app, test printed it and saved it to the cloud.

Printing Labels from NiceLabel

From cloud printing, you can see all the labels you have available to you in your cloud folders.  Choose what you want to print from the thumbnail images provided, select how many labels you want to print and choose the printer you want to print to.

Click the print button and watch the labels print.

NiceLable Cloud Printing

Using NiceLabel

NiceLabel is widely considered one of the best label design systems available.
 
To find out more about NiceLabel and to book a demonstration, contact us at info@expertlabels.co.uk.

Useful Links

Download NiceLabel

Updated 13 Jul 22.

Validating your Labelling Systems

Zebra Printers printing

Validation is used a lot in the pharmaceutical and food production industries. If you need to validate your labelling system but don’t know where to start?  Start here… 

  1. What is meant by validating your labelling systems?
  2. Do you need to validate your labelling system?
  3. Writing up a functional requirements specification (what do you want your labelling system to do)
  4. What hardware, consumables and software do you need in order to test?
  5. Designing an operational qualification (OQ) protocol.
  6. What evidence do you need?
  7. What needs to be validated – the data populating the label and the sources of data.

Validation is used a lot in the pharmaceutical and food production industries. 

What is Validating a Labelling System?

In a nutshell, validating a labelling system is how you evidence that your label printing process produces the same quality of printed labels every time.

You need to know what it is expected to do, write out all the steps and conditions involved – documenting all the settings – and test that it does as you say it will.

Your label printing process must be consistent – you can’t have inconsistently unreadable labels.

We work with international clients both remotely and in person on validation projects.  Contact us for help with your project.

Do You Need to Validate Your Labelling System?

Not everything in a manufacturing process needs to be validated.  High-risk parts of your manufacturing process, that carry a high risk to consumer safety, should be prioritised over low-risk processes. 

Using risk management tools, we can define a list of critical quality attributes (CQA) that describe a pharmaceutical or food production process.

Elements of a labelling system can have a critical effect on products.  The wrong use-by date, the wrong product name or incorrect allergy information could have potentially fatal consequences for consumers. 

Because of the potential harm mislabelling can cause, you do need to validate your labelling systems.

How to Validate Your Labelling System

Let’s start with deciding what outcomes you are looking for.

A clear unambiguous specification of the labels you need.  This is known as Functional Requirements Specification (FRS).

This might include:

  • Barcode using the correct symbology (code 128, Datamatrix) and is readable
  • Barcode includes all the correct information
  • The text is large enough to read and remains legible for the life of the product – i.e. if it’s exposed to chemicals or heat
  • Dosage information is clear and correct
  • The label adhesive sticks for the life of the product
  • The data is correct on each label (i.e. the correct batch code)
  • The printer is able to print labels of the required size range
  • An audit trail of what’s been printed and by whom
  • Permissions for different people to create, edit and approve labels
  • Must be able to incorporate variable data such as lot number, expiration date, serial numbers & randomised numbers in the label design
  • Must be able to read data from CSV files, databases & spreadsheets
  • Must be able to alter data within the software without the need to make changes outside the system & re-import

Put Together Your Labelling System

Normally, you spend time in process design – building a prototype production system. 

Luckily with labelling, the design process is relatively quick, as the options for label design software and printers are limited. 

Once you know what you want – draw up a specification of the hardware, software and consumables you need. 

You will need an installation qualification (IQ) document – a checklist of items to ensure everything is installed to specification.

If you need help, contact us to put together an IQ for you.

An example of this might be

  1. Zebra desktop ZD421 printer
  2. BarTender Label Design Software – Enterprise Edition
  3. CSV data file
  4. 75mm x 50mm Cryogenic labels made in a factory with BRC A accreditation on rolls of 500 delivered on a 38mm core.
  5. Wax resin thermal ribbons – 74m x 89mm.

Using these components you’re able to begin testing your labels. 

Desktop label printer, labels, ribbon and CD

Draw Up Your Operational Qualification Protocol

Now you know what your labelling system needs to do, and you have assembled your labelling equipment, it’s time to draw up the tasks (known as a protocol) that will test what your system does and what it needs to do.

For example –

    1. Load printer with thermal ribbons. 

Load printer with Zebra 2300 black wax thermal ribbon.  Close the print head.  Wait for the printer to calibrate.  Feed through five additional labels to ensure the ribbon isn’t wrinkled. 

Adjustments must be made to the printer printhead temperature (darkness) and speed settings in the software to ensure the label print quality is acceptable.

You will need different labels and ribbon combinations to test to ensure the best results.  Contact us  for samples for your testing.

Approving Your Validation

Validation is normally designed by a production or labelling specialist. 

The protocols are then checked over by a quality assurance (QA) specialist.

The last part of the validation process is the operational qualification – OQ.

The document is then signed off by the author and a QA specialist.

What Evidence do You Need?

Samples of printed labels.

Getting Help with Your Validation

So you know you need to validate your labelling system for your food or pharmaceutical operation and are ready to get started.

We’ve installed dozens of labelling systems for clients, large and small, around the world. 

If you want help with your validation and want to save time, contact us for help and advice. 

Visit our contact us page and get in touch.

Useful Links

Training your staff to use the thermal label printer

You’ve been given the task to train your staff how to use your thermal transfer printer. 

With more than 20 years training people to use label printers, we’ve created a handy activity sheet to keep trainees active during training.  You can print it out and use it.

  • A note about learning
  • Know your printer
  • Switching your printer on
  • Loading it with labels and ribbons
  • Cleaning your label printer
  • Speed and darkness settings on thermal printers
  • Printhead problems  – and using the pressure toggles (found on industrial printers).
  • Useful links

A note about Learning

Having spent a couple of years as a teacher – I’ve come to understand how people learn.

I expect you know this intuitively – but let me summarise…

People learn best by doing – so have your trainees get hands on with the printer.  Use exercises to help learning.

If you talk at people they’ll switch off – so train your team by asking questions and have them think.  It might be slower, but it will produce better results.

Use our downloadable handouts and have your staff makes notes they can refer back to.

A Tour of your Label Printer

Let’s start with a look around your label printer.

Desktop Label Printer

On the outside of the printer you’ll find a latch or latches so you can open the case to load it.

The latches are yellow – in the case of Zebra printers – or might be purple or green with other brands.

Zebra ZD420 Printer

The on/off switch can be at the front or back of the printer.

Status lights such as power on, paper out, network connected and ribbon lights are at the front usually.

Finally – most printers have buttons to feed labels, pause printing and cancel print jobs.

Zebra ZD230 Rear Image

Usually at the rear you’ll find the USB, network connectors and power socket, as you can see with this ZD230 printer.

You can also see a slot for labels at the back of the printer.  If you need to use fan fold labels this is where you feed the blank labels into the printer.

Zebra ZT411

Industrial Printers

Usually, with these larger printers,  one side opens up entirely.

Inside you have easy access to the label hanger, printhead, ink ribbon supply and take up spools.

Controls are at the front of most industrial printers.

The thermal printhead is what a thermal printer is all about. It’s the printhead that heats up and either melts the thermal ribbon onto the label – or heats up and reacts with the heat sensitive coating on a direct thermal label.

A dirty printhead will mean that tiny white lines will appear on your labels. 

Dirt also increases printhead wear to a point where it will need to be replaced.

Media Gap Sensor

The gap sensor locates the gaps between the labels. It’s the red light in the picture to the left.

It can be slid across the width of the labels.

If the sensor is not positioned where it can ‘see’ gaps (i.e. if you’re printing two across labels and the sensor is positioned in the centre where it doesn’t see the label material pass overhead) then the printer will malfunction and continue to feed labels through the printer until it indicates an error.

Ensure the printhead is correctly positioned and keep it free of dust.

The label gap sensor on a desktop printer is more accessible than on its industrial printer counterpart.

Slide it left or right so it is positioned where it can ‘see’ the gaps between the labels or tags.

Desktop Printer sensor

How to Load your Thermal Printer

Loading a desktop printer

Desktop Printer

  1. Open the printer case.
  2. Place the roll of labels or tags on the ‘media’ hold.
  3. Feed between the guides to the front of the printer.
  4. If you’re loading thermal ink ribbon, follow the printer instructions (there are too many different desktop models to describe here).
  5. Close the label printer case.

Industrial Printers

  1.  Open the printer case.
  2. Slide the roll of labels onto the ‘media hanger’ towards the rear of the printer.
  3. Feed the paper through the printer following the ‘media path’ i.e. under various rollers and under the printhead.
  4. Slide the ‘media guide’ (the yellow rectangle in the image to the right) across the width of the printer so it’s gently touching the outer edge of the labels or tags.
  5. Load the thermal ribbon onto its supply spool.
  6.  Feed the end of the thermal ribbon under the printhead and up onto the take up spool.
  7. Close the printhead and make sure it’s firmly in place.
Load labels into your printer

How to Clean your Printer

There are just a few things to keep clean with a thermal printer.  Keep the printhead clean (more details below) and keep the inside of the printer dust free using a soft cloth or vacuum cleaner.

Sensors (the gap sensor in the picture above) should also be kept clean and dust free.  Dust or adhesive build-up could lead to the sensor failing to recognise the gaps between labels. 

Blow dust out if you can.  If there’s adhesive on the sensor, use isopropanol alcohol to clean it off.

The Printhead

Clean the printhead

Industrial Label Printers

Keep the printhead clean by wiping with isopropanol alcohol.  Wipe it across the printhead a few times to remove the build-up of dirt.

Pre-saturated swabs are the most convenient.  Contact us for some free cleaning swabs.

Ideally, clean it every time you change the ink ribbon.

If you don’t use a ribbon then clean every time you change the label roll.

Cleaning a printhead on a desktop label printer

Desktop Label Printer.

The printhead on a desktop printer is a little more accessible than with industrial printers.

If you remove the thermal ink ribbon from the printer, you’ll be able to get to the printhead more easily.

As with the industrial label printers, clean the printhead with an IPA-soaked cloth. 

Darkness and Speed Settings

Two of the most important settings with any thermal printers are the darkness and speed settings. 

Whilst they can be set on most printers using the buttons on the printer, the easiest way to adjust them is via the printer driver. 

These print driver settings are from Windows 10.  They’re broadly the same as previous Windows versions. 

Darkness settings are different with MacOS drivers. 

Printer drivers differ in layout.  To download one of the best drivers for label printers – visit the Seagull Printer Driver page and download a free printer driver.

Finding your printer settings
Where to find your printer settings

The printing preferences option gives you access to all the printer settings you need – the most important ones being setting up the label dimensions. 

The other key setting is the speed and darkness settings.  These settings have the biggest effect on the print quality of your labels.

Click on the Options tab where you will find the speed and darkness settings.

Keeping the darkness as low as possible will extend the life of your printers printhead (and save you money).

Label printer printing preferences
Printing preferences
Darkness and speed options

Untick the Use Current Printer Settings and adjust the print speed.  The slower the print speed, the better the print quality.

To adjust the print darkness, Untick the Use Current Printer Settings and adjust the darkness.  If you’re printing faster, then you’ll need to raise the darkness setting.

Increase the darkness setting if you’re printing with resin or wax resin ribbons.  It’s not uncommon to find the darkness set to maximum if you’re printing onto plastic labels or tags with a resin ribbon.

Printhead Pressure Problems

Incorrect printhead pressure

Sometimes labels can appear faded on one side or another.  This is often because the printhead pressure needs adjusting.

Printhead pressure adjustment isn’t possible with desktop printers. 

On an industrial sized printer, you can adjust the printhead pressure using toggles.

The images to the right show two examples of pressure toggles on different industrial printers.

Use the rotating toggles to increase or decrease pressure across the printhead.

It is better to keep the printhead pressure low.

ZT220 Printhead Pressure adjusters
ZM400 Printhead pressure adjusters

Start Learning How to Use your Label Printer

This is the basics.  Every printer is different, but the fundamentals are the same.

If you are delivering the training – print out our PDF activity sheet for trainees to use.

Label Printer Activity Sheet for Students PDF.

Useful Links

Sustainable labelling

Corporate Environmental Responsibility (CER) and Labels

Biodegradable packaging – including biodegradable labels – are a positive marketing point – promoting your product and doing the planet and future generations a favour.

For some organisations – though – environmental protection and sustainability is more than a nice feeling – they represent a key corporate goal – in some cases it’s a condition of investment funds. 

Corporate Environmental Responsibility (CER) for labels requires proof (certification) that goals are being met.

In this article – you’ll learn how your labels meet corporate environmental responsibility standards and how you’re able to certify this.

Expert Labels

If you need any help or advice with your labelling – contact me.

Miles – Expert Labels

Take a look through our article and understand more.  Learn:

  • What is CER and what’s our aim with it?
  • What are certified biodegradable labels?
  • What CER certification exists?
  • What is the real impact on the environment with biodegradable labels?
  • What part recycling labels has in CER?
  • Biodegradable versus recyclable labels
  • What can we do about labels that don’t meet sustainability and biodegradability standards?
  • Contamination by inks, varnishes and adhesives.
  • Is the rest of the packaging biodegradable?
  • Certification of packaging and labels – EN13432 and FSC standards.
  • Practical considerations of using CER labels – lead times, minimum volumes and costs

What is Corporate Environmental Responsibility?

Corporate Environmental Responsibility (CER) is recognition by companies that they have a part to play in reducing harm to our planet and eco-system.  CER has the overall goal of reducing harm to the environment.

Sometimes this is done because responsible management genuinely care about our future, sometimes it’s to secure investment (which has a CER condition attached) and sometimes it’s to benefit from positive publicity or reverse negative public opinion.

Whatever the motive, how can you prove your CER credentials?

What are Certified Environmentally Friendly Labels?

In order to get credit for your label CER efforts, you need to get proof you are making an effort.  Proof comes in two forms – certified materials or 3rd party assessment of your packaging.

A handful of labelling products come with certificates to show they are compostable and many are FSC certified.  There are a number of environmental auditors who are prepared to assess your entire operation and give a rating of your sustainability efforts.

What are Biodegradable Labels and Packaging?

Biodegradable means that the labels and packaging will breakdown when exposed to the environment.  Just as importantly, they won’t leave behind any toxic residue when they do. 

Biodegradable labels can be certified as compostable, which means they’ve been tested under commercial composting conditions.  If they break down in commercial conditions they will breakdown in home composting conditions – but it may take a long time – if the conditions are not quite right.

Contamination by Inks, Varnishes and Adhesives

Ink and varnish on labels reduces the compostability of the label. 

Ink and varnish won’t affect compostability certification, as long as they don’t contribute more than 5% of the total weight of the label.  If it does weigh more than 5%, it won’t be able to be certified without further testing.

Biodegradable labels have adhesive that biodegrades and doesn’t leave toxic residue.

What Part Does Recycling Labels Have in CER?

The use of recycled materials in labels and the disposal of product with labels into the recycling system all play a part in Corporate Environmental Responsibility.

Labels, by their nature, are dependent on how the end user disposes your product or packaging. 

You need to make a decision about whether you trust (or have researched) your clients’ inclination to recycle your product packaging or will they simply discard your products (and therefore the packaging and labels).

If studies show labels are discarded irresponsibly (as I think it would be fair to say some fast-food packaging is) then in order to be true to your CER word, you’ll need to use biodegradable labels.

Biodegradable paper labels are the perfect solution – they are both recyclable and biodegradable.

Biodegradable plastic labels are a different matter.  Biodegradable plastics contaminate recycled materials and shouldn’t be recycled.

Sustainable Labels and CER

Sustainability is a big part of CER. There are a few sustainable label materials to help your CER efforts.

With paper labels, the paper used in manufacturing is (most of the time) FSC – Forestry Stewardship Council – certified paper. The FSC brand certifies that the material used comes from a sustainable and responsible forestry company. Sustainability includes wildlife habitats as well as replanting trees.

Cane fibre labels are a popular sustainable label material. The labels are made from sugar cane fibre material mixed with natural hemp and linen. The sugar cane material is a biproduct of the production of sugar so production of sugar cane paper has the added benefit of avoiding waste.

As an added benefit, cane fibre labels are made with biodegradable adhesive, making them fully biodegradable and meet composting standards.

Options for plastic labels include bio-plastic labels – although the labels contain an element of petro-based oil, the renewable content is much higher.

Rock paper is label material made from recycled plastic and marble dust.  It has a soft touch and is waterproof.  Rock paper can be recycled and is made without the use of water – which the manufacturers claim is more sustainable.

Soya-based inks are sustainable – but these inks are a specialist material and not widely available.  Contact us to discuss soya-ink labels.

Is the Rest of the Packaging Biodegradable?

Labels play a small part in CER and work hand in hand with product packaging.

Without a product’s packaging being ‘compatible’ with the label – the overall CER benefits are lost.

You won’t be able to recycle a label if it’s attached to the wrong packaging.  For example – plastic labels attached to a cardboard box.

Suitable partnerships include:

Paper labels on card or paper packaging

Plastic labels on plastic packaging

Compostable labels onto paper or card


Certification of Packaging and Labels - EN13432 and FSC Standards

Compostable logo
Look for the compostable logo

The two certifications around packaging and labels are the compostability standard EN13432 and the Forestry Stewardship Council (FSC).

FSC certification is a mark of ‘sustainability’ on forestry products, everything from cork, latex, timber to, of course, paper labels.

Biodegradable labels are made from materials that are tested under EN13432 and meet standards such as size of particles after six months and whether there are any toxins present.

We’re not aware of any certification surrounding non-biodegradable plastic labelling.

How We Can Help Your CER Efforts

  1. We can advise you on which labels are compostable and provide certification.
  2. If you need a Forestry Stewardship Council (FSC) chain of custody certificate to go with your paper labels we can help you get that.
  3. We can supply you with biodegradable labels.
  4. We can also make recommendations about recycling your labels and suggest suitable labels that can be recycled with your packaging.

What About Labels that Don't Meet Recycling and Biodegradability Standards?

In order to meet standards you must use products that meet EN13432, the compostablility standard or FSC certified paper.  Compostable labels are made from paper or biodegradable plastic material.

Some label materials aren’t biodegradable or made from paper.  In this situation, the next best solution is to make recycling as easy as possible – matching label and packaging materials. 

If recycling isn’t possible – for example metal products with waterproof labels – then the least harmful approach would be to use sustainable plastic labels – such as rock paper or bio plastics.

CER Labels in Practice - Lead Times, Minimum Volumes and Costs

FSC Labels

Sustainable paper labels from the Forestry Stewardship Council are widely available and easily sourced.  Leadtimes are typically ten days and prices are standard prices.  The other factor found with label materials is minimum volumes.  Because FSC sourced paper is so widely used, there are no difficulties with minimum volumes.

Biodegradable Labels

Biodegradable labels are still not produced in volume – and neither are the materials.  The result is that label manufacturers are reluctant to hold stocks of material – so if you’re buying biodegradable labels – (biodegradable paper or plastics) you’ll likely be paying for a new stock of material.  Lead times for special materials (as biodegradable is considered) are often longer than for standard products. 

Prices for biodegradable labels are significantly more expensive than standard materials.  For examples 1,000 paper labels would cost £15, for similar biodegradable paper labels expect to pay £110.


Useful Links

Labels for your products

What Do You Want Your Product Labels To Say?

Step 1: Request A FREE Quote

We Help You Choose the Right Labels For Your Products.

About

Expert labels are specialists in producing beautiful labels to make your products stand out from crowded shelves. From low cost paper labels to clear, waterproof labels – we help you sell more.

We have more than twenty years experience making sure your labels are delivered on time to do the job they’re supposed to do, every time.

Start by getting a free no obligation quote by clicking here.

Clear Bottle Labels

Products:

batch-no-labels

Batch & Serial No. Labels

Print your own, or let us print your batch and serial numbers for you.  Choose numbers, 1D or 2D (QR Codes) Barcodes.

secure cut labels

Tamper and Security Labels

Specially cut tamper-proof security labels or high security holograms to protect your products.

clear labelsWaterproof Labels

Choose from a wide range of materials – printed onto clear or full colour labels .


Let’s talk technical

We supply labels on rolls, either pre-printed or for overprinting with thermal label printers. We make labels to a huge range of specifications – from waterproof, gold or silver foil, clear labels, perforated labels, large rolls and small rolls.  We have over 6,000 label dies to cut your labels to the exact size you need. Our labels are made from paper, HDPE, PE, Polyester, Vinyl, PP, Tyvek or any number of specialist materials.  We can fully customise your labels with sequential numbering, printing from a database or unique full colour labels.

Expert Labels

  • Have been supplying labels, tags, tickets, barcode scanners and printers since 1994
  • Use specialist digital printing equipment for full colour label printing
  • Are trusted by many of Europe’s best known companies to delivery on time and to exacting standards of quality
  • Stand by our products with a money back guarantee

We work with organisations who need high quality labels delivered on time and also value a supplier who provides end-to-end printing and scanning expertise.

Some of Our Clients

Some of the hundreds of clients who trust us for their labels, printers and scanners.

logos

Label Jargon

In the world of labelling and printing, there are lots of phrases we use on a regular basis that may not be familiar to you, our visitor.  Here’s your guide to the labelling jargon you’re likely to hear.

Even clients of ours who are well-versed in the lingo sometimes surprise us by wanting to know exactly what we mean by particular terms we might simply take for granted.

So we thought it’s about time someone came up with a handy “jargon buster” to explain what it is we actually mean by some of the labelling jargon you’ll find in our industry.

Proof A common term that means a prototype version of a label (usually just an electronic image file) that is developed in order to be checked by the customer for accuracy. Once the proof version is approved, the label is ready for production.  The last thing you or I want is a spelling mistake on 100,000 labels and proofs are our way to prevent it.
Face Stock

Label Facestock and Backing paper
A layer of paper, film or other material that makes up the “front facing” part of the label. It will usually have a layer of adhesive or glue on the backing, with the viewable words and imagery printed onto the Face Stock.
Plates Usually made of plastic – though sometimes made of other materials such as rubber or metal – plates are used to transfer the ink to the label being printed.
Applicator
Handheld label applicator

Automatic Label Applicator
A machine that applies pressure sensitive labels onto an item that is being labelled. (Pressure sensitive labels being the type that stick to the item when you press them onto the item).  Often this is a machine that automatically applies the labels – sometimes it refers to a handheld device that is used for labelling.
Kraft Backing Krafting is the process of converting wood into wood pulp. This material can then be made into kraft paper, which is stronger and more durable than ordinary paper. It can be used for Kraft backing paper – often used in the process of picture framing.  Not often used with label printers as Kraft paper is thick and doesn’t work well with the sensors that printers use to sense the cap between labels.
Removable Adhesive A type of adhesive (“glue”) that allows the label to be removed from the item without leaving much residue behind.  This is important for labelling high gloss items such as glass or giftware. For example, the type of adhesive used on sticky writing (post it) notes would be a removal adhesive.
Peelable Adhesive This is essentially another term for “removable adhesive”. It refers to the type of adhesive (“glue”) that allows you to peel off a label from its backing as well as allowing the label to be peeled from the item it is eventually stuck on to.
Permanent Adhesive An adhesive (“glue”) that binds much more strongly to the item it comes into contact with. Permanent adhesive is very difficult to remove from the item without the use of considerable force.  Permanent Adhesive is the most common glue found on labels.
High Tack Tackiness refers to the “stickiness” of the adhesive used on the label. A label with high tack will have a stronger adhesive and thus a high degree of “stick”.
DPI

DPI comparison
DPI comparison
Standing for Dots Per Inch, this is a well-known measure of the level of resolution for printing this isn’t specifically labelling jargon, you’ll find it in printers and software. DPI literally relating to the number of “dots of ink” that can fit along a printed line that is an inch long. (The equivalent for a computer screen would be Pixels Per Inch (PPI) – though many people use DPI to mean the same thing).  Thermal label printers tend to print at 203 dpi – or 8 dots per millimeter.
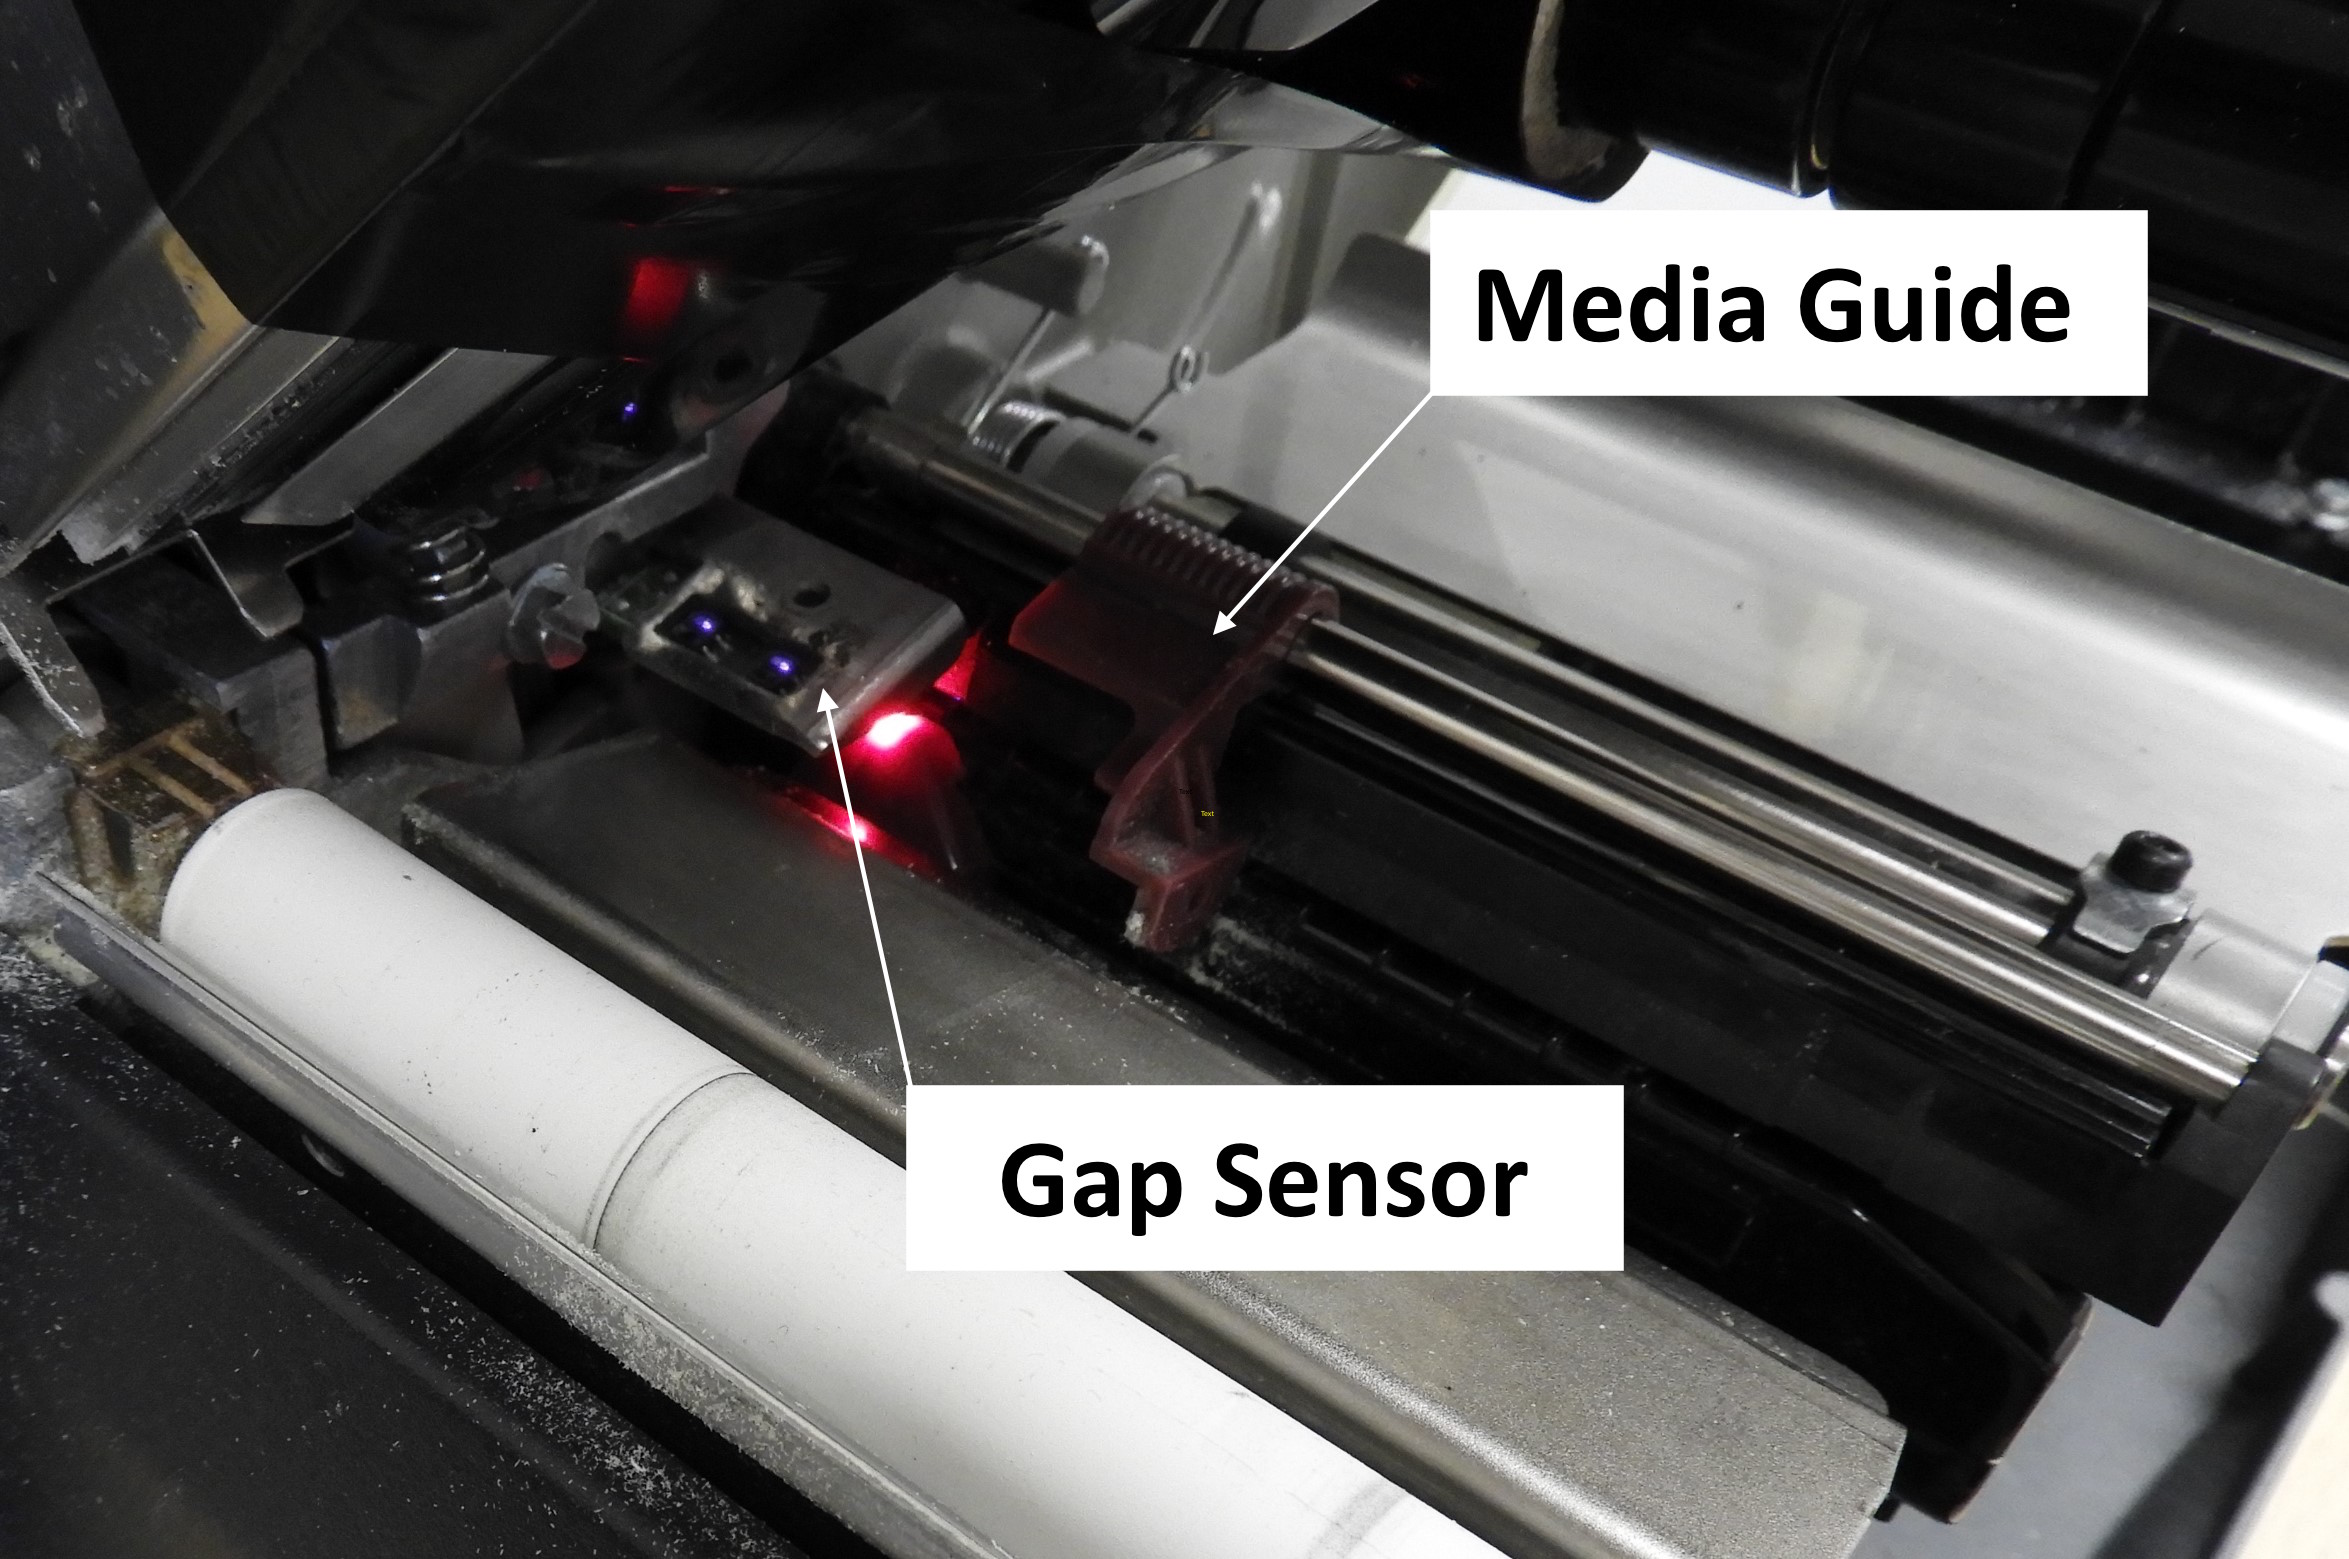
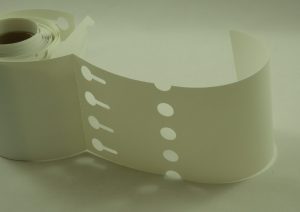
Label Gap When you have a group of labels attached to a backing sheet (for example a roll of labels), the label gap is the distance between two labels.  This is usually around 3mm if labels are used with thermal printers.
Black Mark

Black marks on clear labels
A Black Mark may be printed on the back of the label liner to guide certain types of printer as to where to print the label content. Black marks are essential where a label printer is printing to a clear label.  Label printers use a sensor that beams a light through the relatively transparent backing paper and recognises when there is an opaque label.  With a transparent label the printer needs another way to recognise the label gap.
Across the Web

Labels across the web
This refers to the number of labels across the backing sheet.  If you’re using a wide printer you can print more labels at the same time and increase productivity.
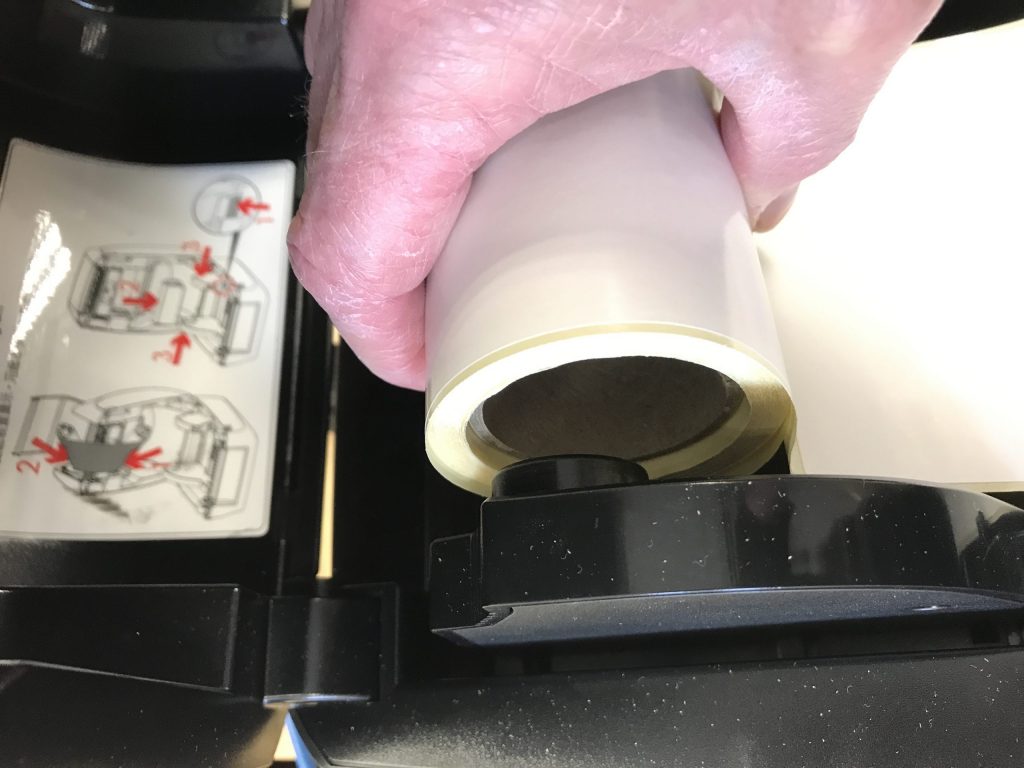
Cores

Label cores
Label cores
Tubes which the label sheets are wound around for shipping purposes. Usually made of card or plastic.  They come in a range of diameters, 25mm, 44mm or 76mm, along with a range of widths.
Tamper Evident

Tamper evident labels
These are labels that display evidence of any lifting or removal from the item they are attached to. They may be used for the purpose of eg preventing price labels being switched onto a different item, or for sealing boxes, computers – even doors shut – with any attempt to open the door displaying evidence of tampering on the label.  See the security labels we supply here: http://expertlabels.co.uk/applications/security-labels/
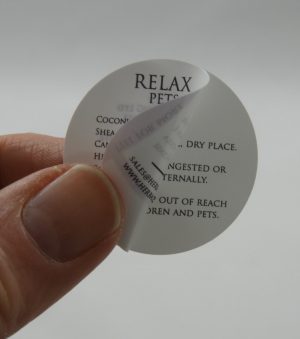
Ultra Destruct

Ultra Destruct labels
Ultra Destruct labels – don’t peel but crack when you try to remove them
A type of tamper evident label that breaks up like an egg shell if tampered with – thus acting as an obvious deterrent to removal as it will be obviously there has been an attempt to remove the label.  This type of label is demanded by the Falsified Medicines Directive.
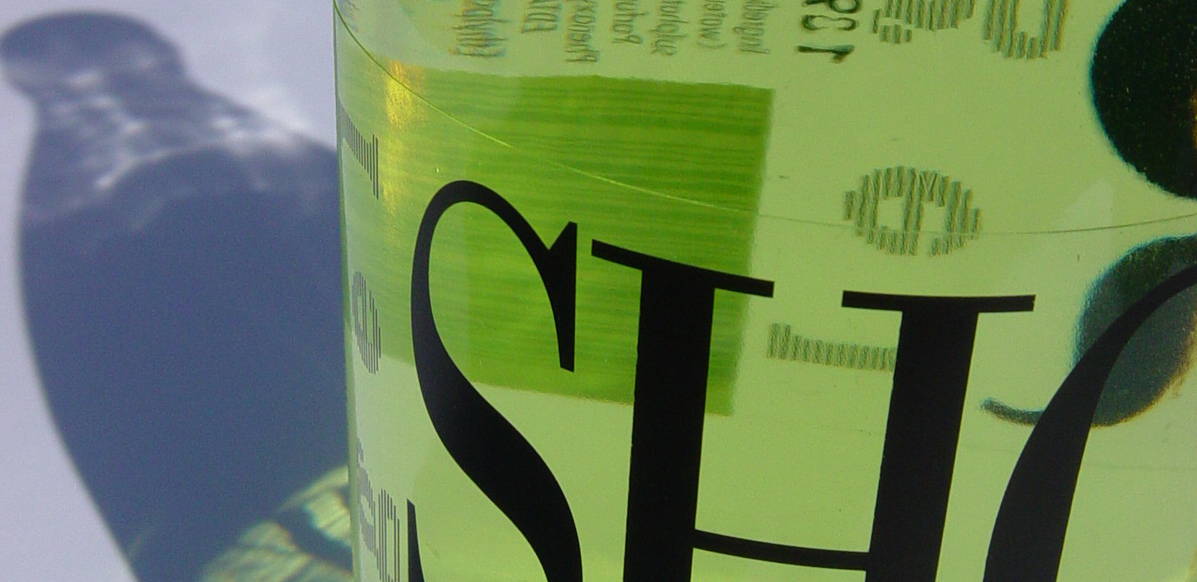
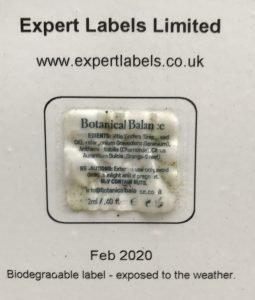
Direct Thermal This is talking about a type of label or tag printer.  A Direct Thermal Label Printer has a print head comprising of thousands of tiny pixels.  The pixels on the printhead can be independently heated.  Now if you pass a heat sensitive paper or tag material underneath a hot object it will turn black.  So if you take a heat sensitive paper and a printhead that can turn on thousands of different little dots, you have a way of printing!  This is direct thermal – as opposed to Thermal Transfer printing.  Shortcoming of direct thermal printing – is that it only works with specially coated paper or card.  The labels or tags printed will turn black if subjected to heat from the sun or elsewhere.
Thermal Transfer Printing
How thermal transfer works
How Thermal Transfer works

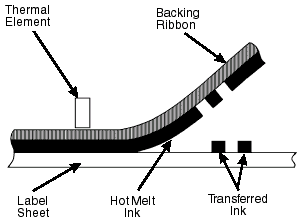
If you take a direct thermal printer and place a sheet of ink that melts between the print head and the label or tag you are able to melt the ink onto the label.   Thermal Transfer paper have a roll of ink that melts onto the paper using a thermal printhead.
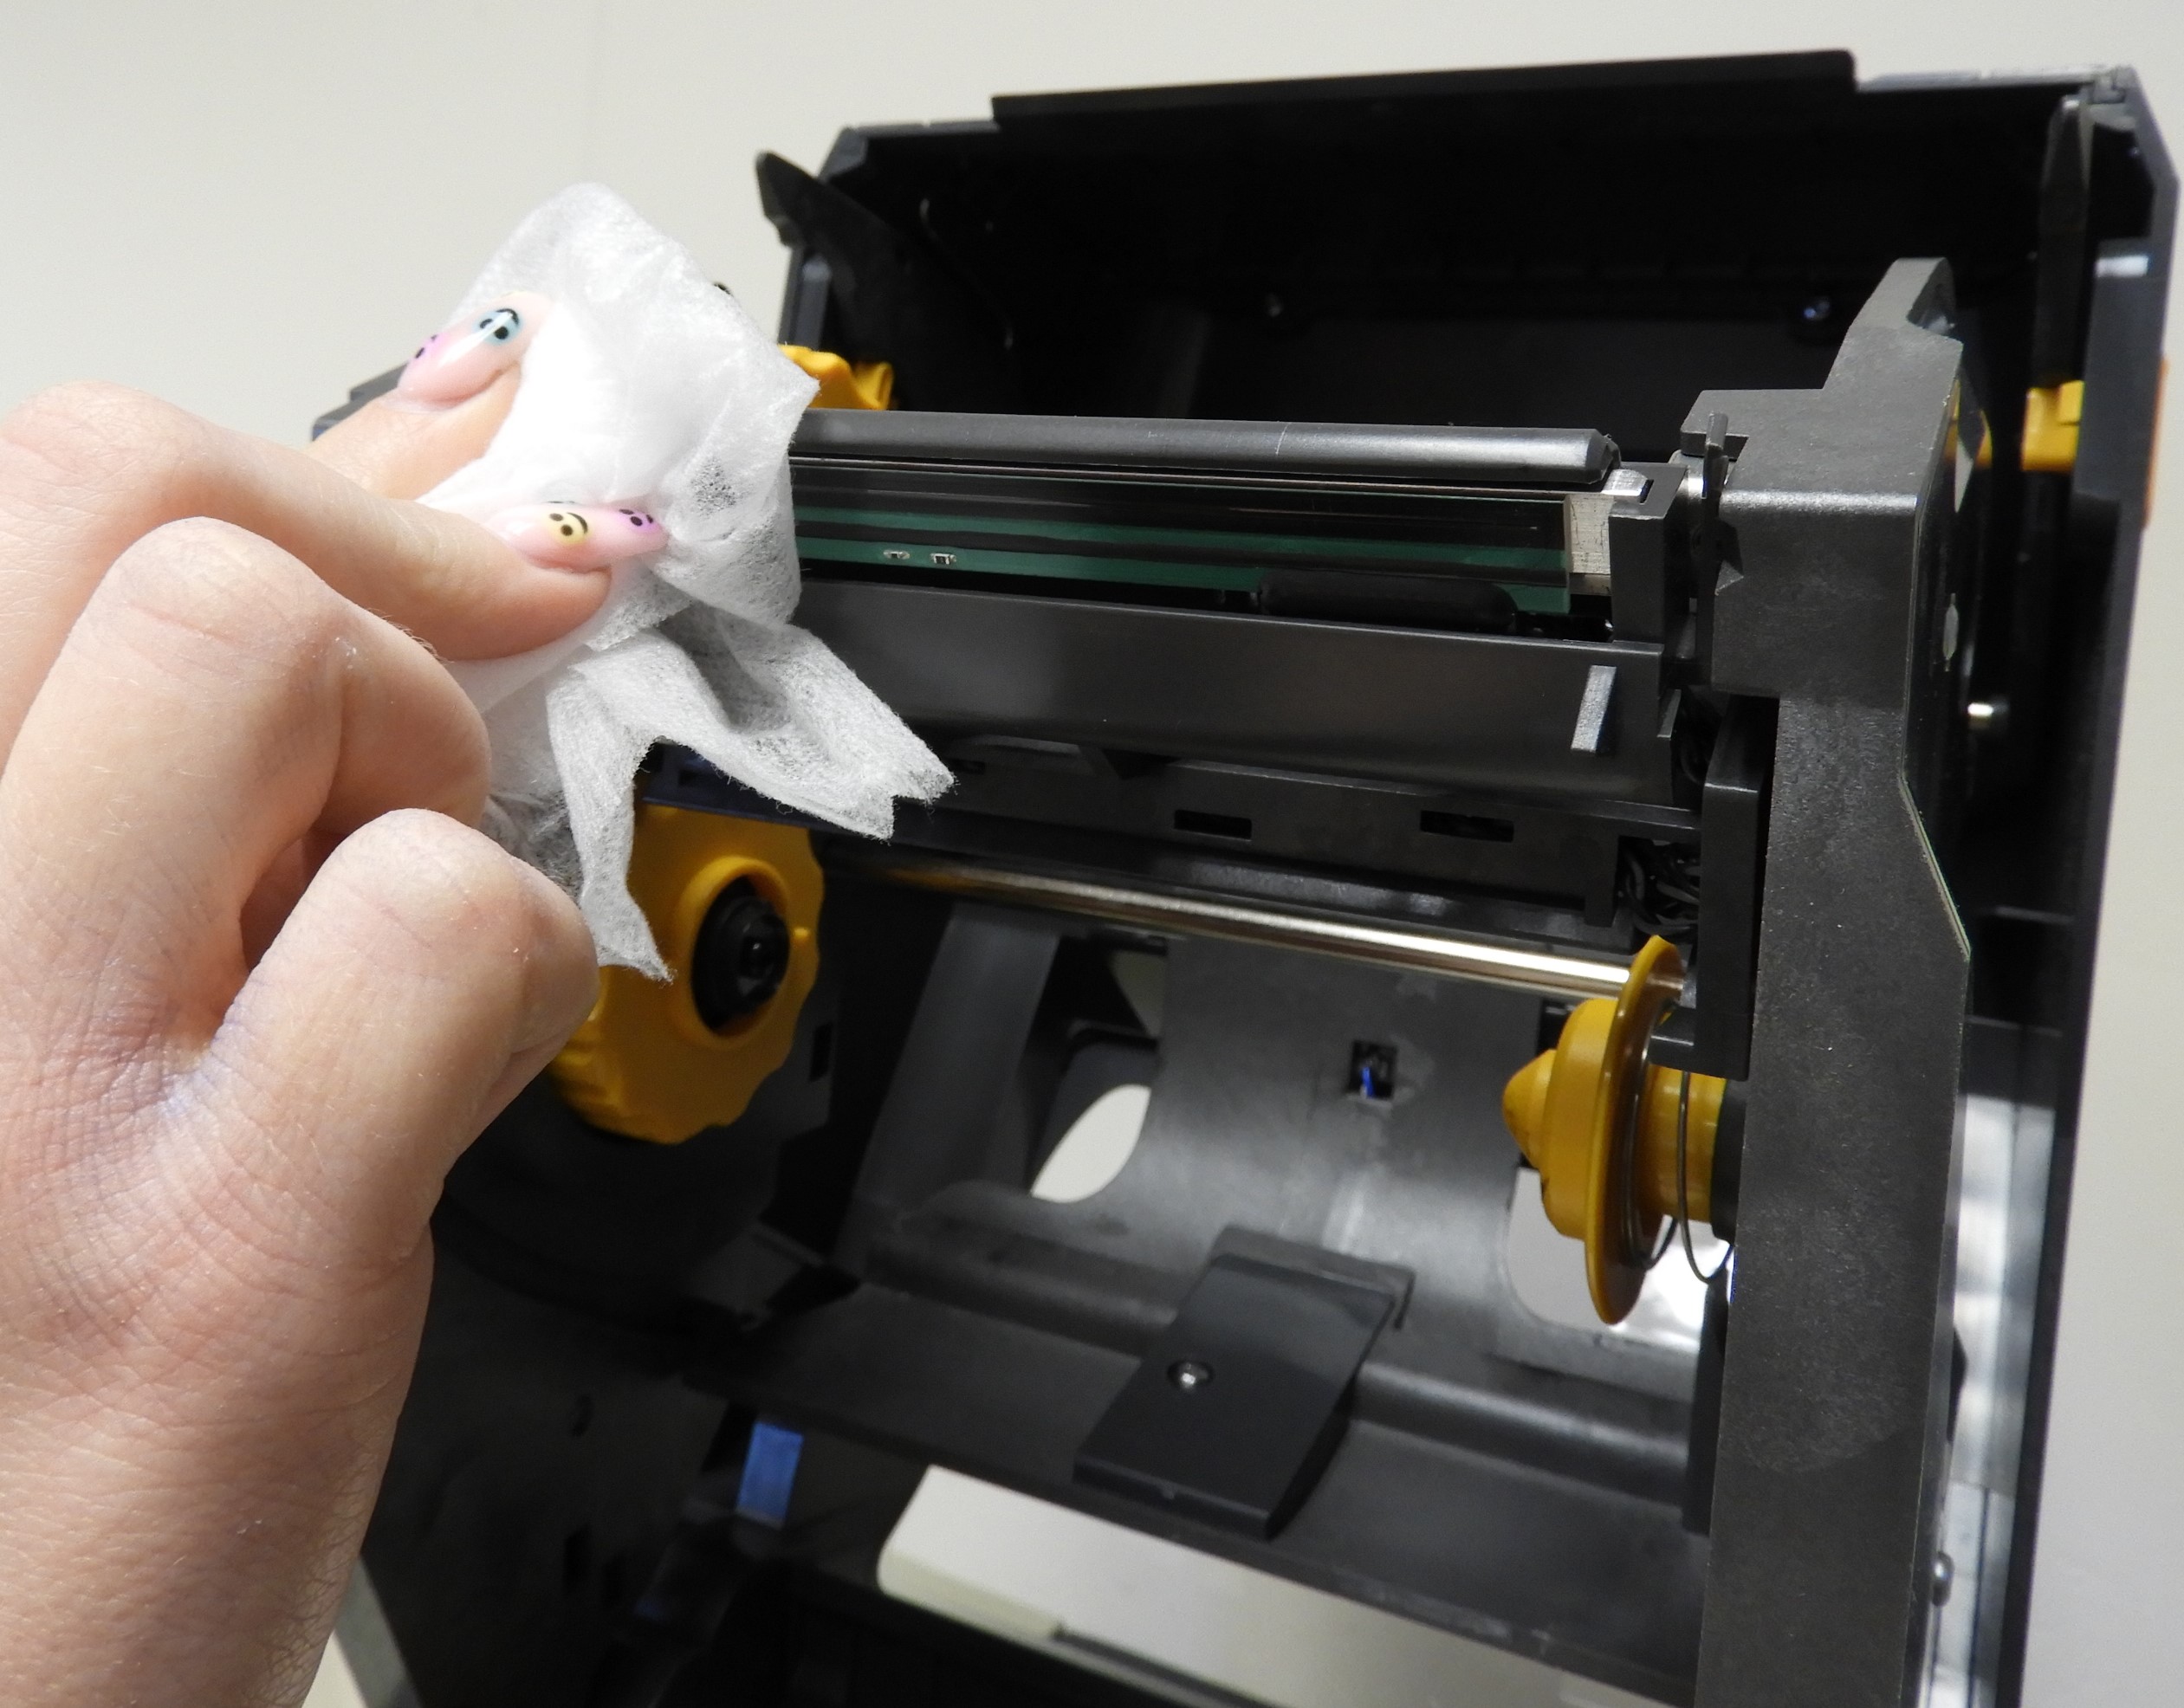
Printhead
Thermal printhead
Thermal printhead

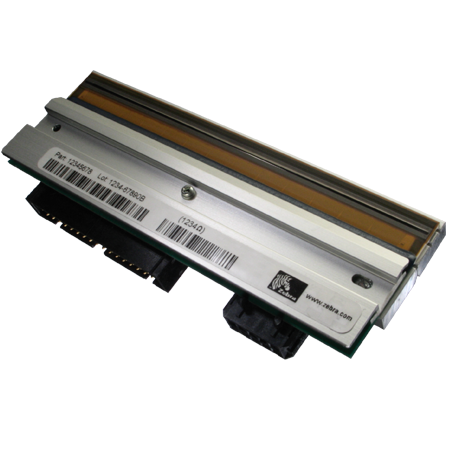
This is the part of a thermal printer that heats up and melts ink onto the label or tag.  Can also heat paper coated with a heat sensitive ink that turns black when heated.

Useful links

When it comes to barcode specific jargon, GS1, the international barcoding organisation, has a handy glossary explaining much of the barcoding, not necessarily labelling jargon:

GS1 Barcode glossary: http://xchange.gs1.org/sites/glossary/en-gb

How to decide a label budget

What Your labels are Made of Affects Your Label Budget

Peelable Paper Labels
Paper is used for product labels

At the bottom of the price range are good old paper labels.  You’ll find paper labels on bottles and consumer products.  Paper labels are perfect for cardboard boxes, pallet labels and warehouse labels and on documents.   Businesses of all sizes use paper labels, particularly so in retail, healthcare and logistics.  Matte or gloss labels will cost around the same. 

Thermal paper turns black when it’s printed with a thermal printer.  Thermal labels are perfect for shipping labels and fresh food.  You’ll find a lot of businesses use these in their dispatch area – particularly in transport and logistics.  Thermal paper makes printing labels easy because there’s no ink used.  Expect to pay a little more for thermal paper, versus plain paper labels.

Next are standard plastic labels.  Plastic labels are used on assets – where labels are expected to last a couple of years on products.  Plastic labels are waterproof so you’ll find them in garden centres and horticulture.  Cosmetics and food and drink also use plastics as they are resistant to oils.  Chemical labels are made of plastics as are many laboratory labels.  Expect to pay 50% more than paper labels.

Clear labels – made from plastic (PE and PP) are marginally more expensive than their white counterparts.  Clear labels are found in a lot of food and drink packaging and extensively in cosmetics, as they allow the product to be seen – and they offer a more attractive appearance. Expect to pay 60% more than paper.

PET plastic labels are more durable and more expensive than standard plastic labels.  If you need labels that are scratch-proof or for higher temperature ranges you need PET labels. 

These labels appear in specialist areas such as high temperature applications – and on assets where durability is important.  Expect to see PET labels in product labelling and healthcare.

PET labels will cost 75% more than paper.

Biodegradable Labels come in paper, biodegradable plastic and clear biodegradable plastic forms.

Biodegradable label material is a small % of global production.  Because volumes are comparatively small, prices are high.  Prices will come down as biodegradable labels become more common, but never as low as standard paper or plastic labels.

Biodegradable labels are used by organisations who have made a commitment to protect the environment – where the environment is a key brand value.  Cosmetics and high quality foods often champion the environment.

Biodegradable label
Biodegradable labels

Expect to pay five times as much for biodegradable paper labels compared to standard paper.

Biodegradable plastic labels (clear and opaque) will cost around ten times the price of paper.  Plastics cost more than paper and biodegradable plastics cost more still.

Sustainable labels – labels that are both recyclable and don’t use water or harmful chemicals in production (e.g. Rock Paper Labels).  They aren’t necessarily biodegradable.  Sustainable labels cost around ten times what standard paper costs.  

Global volume of Rock paper is tiny compared to other materials hence a high cost.

Get Quote

High temperature labels will cope with temperatures up to about 350C and cost 20 x more than paper materials.  Used in specialist industries – like electronic PCBs, automotive components or aerospace.

Ultra-high temperature labels will cope with temperature up to 1200C and will cost an impressive 1,000 x more than the equivalent in paper.

Ultra-high temperature labels appear in scientific testing, metal manufacturing and glass manufacturing.

Heat resistant labels
Ultra-high temperature labels

Label Prices Are About the Number of Labels Printed

Flexo Label Press
Label Printing Presses are Expensive

Little bit of background: Printing labels consists of loading the printing press with a roll of material.  Fitting a die (a die is a metal shape with sharp edges that cuts out the shape of the label from the label material) in order to cut the labels. 

Then, if there are colours to print, there is the printing plate to fit, then select the ink and set it up.  Then… 

You get the idea – there’s a fair amount of time before the first label can be printed. 

As you can see above, label printing presses have rollers and loops so to feed the material through the press could take anything from 3 meters to 50 meters of material – before you’ve cut out the first label.

Before the first label is printed – there’s time and waste material. Then there’s time cleaning ink off the press afterwards.

Label presses run at several meters a second.  Several thousand labels might be printed in a few seconds, yet setting up the printer took 20 minutes. 

With sophisticated printing presses costing hundreds of thousands of pounds – every minute the press is used for needs to be charged out. 

What I’m getting at is: the cost per label drops massively in the first few thousand labels you print, because so much of the total cost is set-up cost.

How Bespoke and Standard Shapes and Sizes Affect Your Label Budget

Huge Cutter library
This is a label cutter

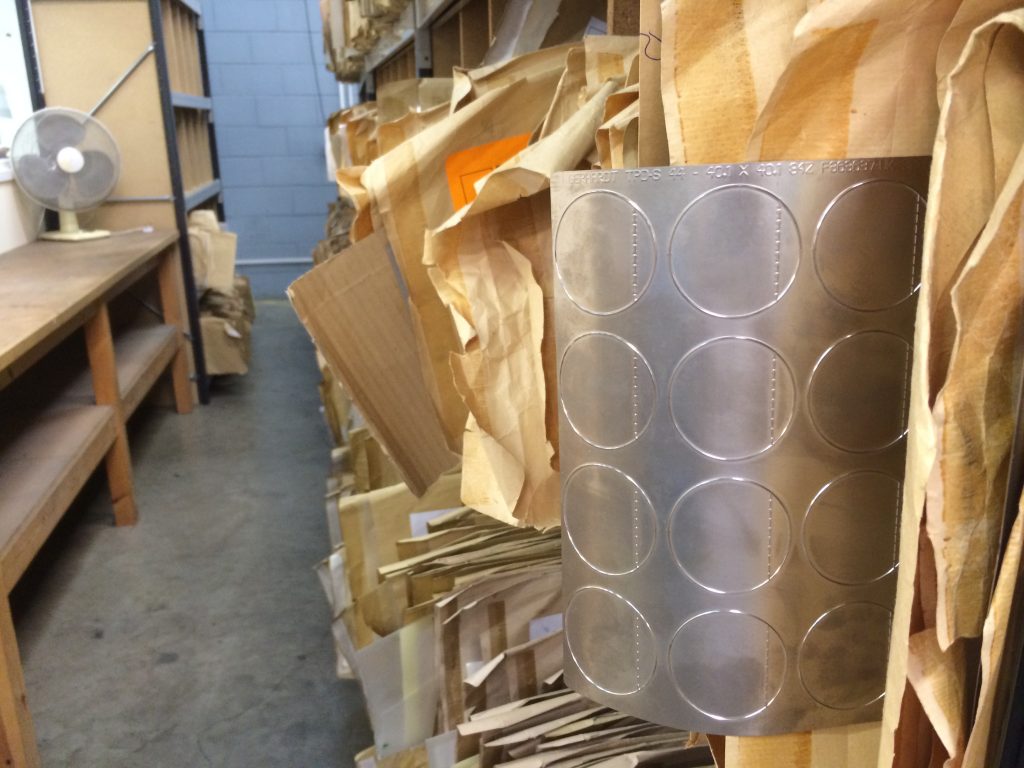
As I mentioned earlier – dies – or label cutters (also known as ‘tooling’) – are the pieces of metal that cut out the shape of the label or tag from the huge rolls of label material. 

We have thousands of label dies in our die library.  However, what happens when we don’t have the exact size you need?  We have to have the die made.

Label dies are precision-made by engineers in an off-site factory using large industrial tooling machines.  They are (usually) made from relatively thin sheets of magnetic metal.  Whilst they get made quite quickly – it still takes a few days to get turned around.

If we don’t have a cutter that suits your label project – either because you need an unusual size or a very precise size – expect to pay £100 – £250 (depending on how many cutting faces you need).  The smaller the label, the larger the cost of making the die.  If you need perforations between labels – this will bring the cost of the cutter up significantly.

If you need plastic labels, the cost of the label cutter goes up two-fold because the cutter needs to be more durable.

White Plastic Loop Lock Labels
Heavy Duty Plastic Loop Lock Labels

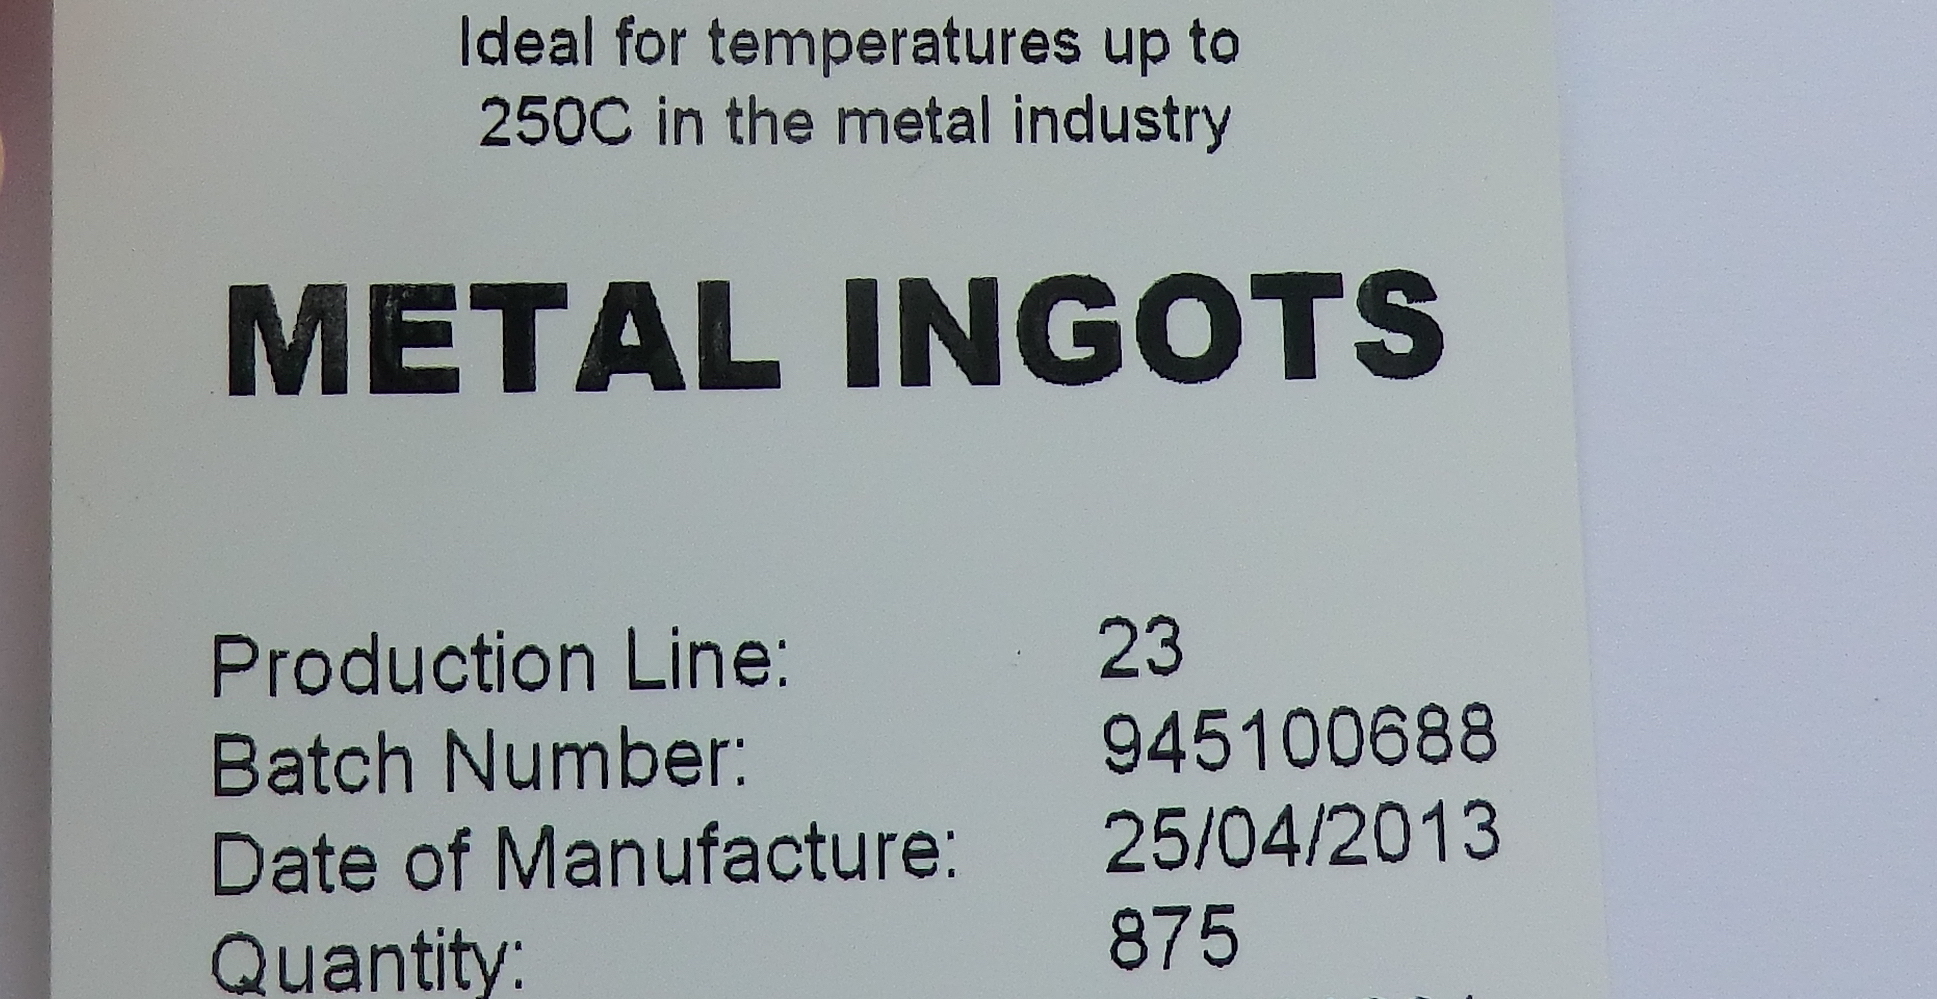
If you need tags cut from heavy duty plastic, such as the horticultural tags in the picture above, and we don’t have a size that suits your tag project, expect to pay more than £1,000 for the die cutter.  Cutters for heavy-duty plastic need to be made from solid pieces of metal (so they can be sharpened) not the standard metal sheets you use for paper or thin plastic labels.

Label cutters are a one-off cost, an added cost item in your first label order. 

If you decide to get your labels printed elsewhere you will need to buy a new set of  label cutters, as they are custom made to suit the label printing press they are fitted to.

How Colours Affect Label Costs

Colour labels

Colours make a big difference to your labels.  If your labels sell your product – you need all the help you can get – and that starts with using colours.

If we are printing your colour labels using a traditional ‘flexo’ printing press, each colour on your label costs money to print. 

That’s because inks need to be carefully mixed so they are an exact colour match.  The printing press needs to be set up in order to align the colours and the press adjusted so it prints perfectly.

Then, after the labels are printed, all the machinery needs to be cleaned so future print jobs aren’t contaminated.  Cleaning needs to be factored into the cost of the print job.

Not only do you need to cover the costs of printing the colours,  there is a one-off £40 ‘plate’ charge.   Plates are flexible rubber (or plastic) sheets that print an image of each colour onto the label.

Digital Label Printing.

Over the past ten years, digital printing presses (imagine a massive laser or inkjet printer) have become more common. 

Digital printing press used for peel and reveal labels
Digital printing press

Digital printing presses eliminate the need for printing plates.  There’s no need to clean the ink off the press after each print run and set up is faster and easier. 

A big part of the cost of labels is ‘recovering’ the cost of the printing press – every minutes spent printing (or setting up) needs to be charged for. 

Digital presses are generally slower than traditional printing presses.  Because they are slower, there does come a number of labels where traditional presses are more efficient.

Digital printing means short runs of several thousand labels in multiple colours are much more cost effective.

Special Labels - Peel & Reveal and Booklet Labels Costs

Peel and Reveal label - round
Peel & Reveal labels

Regulations call for more and more text to appear on labels.  Sometimes you might want to simplify international product distribution by including multiple languages on one label. 

With small spaces – the solution is to use multi-layer labels – Peel and Reveal and Booklet labels – where your message can be printed over several pages on one label.

Multi-layer labels are used a lot in food and drink, cosmetics and pharmaceuticals businesses.

Peel & Reveal labels are quite an engineering feat.  Multiple layers of material printed on both sides with a hinge and special adhesive.

All that engineering and complexity means the machinery to make them is expensive, not to mention Peel & Reveal labels have to be tear-proof – so need to be made from plastic. 

What appears to be a simple concept is relatively expensive compared to plain paper labels.

Booklet and fold-out labels cost more than Peel & Reveal, even though they are made from paper.  The machinery to make Booklet and Fold-Out labels is significantly more complicated than Peel & Reveal machinery.

Example price for 1,000 30mm circular two-leaf Peel & Reveal labels printed – £670.  For 5,000 you’ll pay £690. Just £20 more. 

For a 45mm x 55mm 8-page Booklet Label with two colours – just 1,000 costs £2,605, with 5,000 costing £2,842

Get Quote

Label Finishes - Soft-Touch Varnishes, Gold Foiling and more

Embossed labels

Whilst adding ’embellishments’ to your labels adds cost – the perceived quality jumps – more than off-setting the cost of the enhancements.

Foiling, special rough-touch or soft-touch effects, different textures and spot varnishes are seen on high quality food and drink products, cosmetics and high quality packaging. 

Vaping juices and other potentially toxic products are printed with a raised warning triangle on the label.  These are all uses of ‘Embellishments’ on product labelling.

When your customers compare your product to a competitor’s product, the packaging is often the only difference – and if your packaging looks and feels quality – your price can more than cover the labelling costs.

  • Soft touch
  • Embossing
  • Debossing
  • Matte or gloss lamination
  • Textured
  • Spot varnished
  • Foiling

Ask us about making your labels stand out from the crowd.


Some Example Label Costs

These are example costs and just give a good idea of the sort of price you’d pay for labels. 

Please note, these prices are only a guide.  As you have read, there are many different variables included in pricing labels.

Click the Get Quote button below to request an up-to-date and accurate price.

Please allow for VAT and delivery (approx £15) in your budget.

Get Quote
DimensionsMaterialDetailsQuantity & price 1Quantity & price 2
38mm x 25mmStandard matte paperBlank white1,000 - £1540,000 - £160
45mm x 25mmGloss or matte plastic Blank white10,000 - £12030,000 - £155
50mm x 25mm Clear PlasticPrinted with black4,000 - £2088,000 - £238
50mm x 25mmPET plastic labelsGloss white, blank8,000 - £8516,000 - £117
50mm x 13mmHigh TemperatureBlank - suitable for up to 350C20,000 - £1,34840,000 - £2,115
50mm x 30mmHigh TemperatureBlank - suitable for up to 350C1,000 - £1,038
50mm x 20mmBiodegradable paperWhite, Blank1,000 - £1105,000 - £155
65mm x 65mm Cane Fibre Biodegradable White, blank sustainable labels1,000 - £2135,000 - £277
46mm x 46mmClear biodegradable1 colour2,000 - £200
50mm x 50mmPaper4 page Booklet label full colour1,000 - £1,6002,500 - £1,672
50mm x 65mmPaper8 page Booklet label10,000 - £2,65020,000 - £3,024
54mm CirclePlastic 5 page Peel & Reveal labels. Colour first page, black text on other pages.1,000 - £5925,000 - £900
32mm CirclePlastic3 page Peel & Reveal labels. Colour first page, black text on other page.4,000 - £429
25mm x 25mmRock Paper4 colours. 8 designs - digitally printed.4,000 - £568
50mm x 30mm Ultra-high temperature ceramic labelsBlank - print with thermal transfer printer. Suitable for temperatures up to 1250C. 15,000 - £5,900
100mm x 15mmUltra-high temperature ceramic labelsBlank - print with thermal transfer printer. Suitable for temperatures up to 1250C. 44,000 - £9,600
250mm x 25mmHeavy duty plasticBlank White Loop lock labels2,000 - £8010,000 - £370
50mm x 72mmHeavy duty plasticBlank white Non-adhesive Tags 3,000 - £3156,000 - £350
50mm x 50mmPaper2 colour labels1,000 - £1255,000 - £180
38mm x 38mmPaperfull colour labels1,000 - £105
25mm x 6mmPlasticBlank white Cryogenic labels1,000 - £1902,000 - £220
45mm x 30mmPaperBlank white block out labels3,000 - £1306,000 - £145
50mm x 30mmPlasticMark & Seal electrical safety labels 1 colour printed1,000 - £140
50mm x 35mmPlastic1 colour printed overlaminated labels1,000 - £235
101mm x 152mmPaperDirect thermal shipping labels5,000 - £11520,000 - £250

Updated: 1 Apr 2021

Inline Verifier

How to assess your labels for quality

Substandard labels cost you money, reputation and a great deal of inconvenience.   To avoid this, you need a process in place to assess your labels for quality.  This is critical in pharmaceuticals and other high compliance industries.  If you supply the major retailers you will be fined if your labels are not compliant.

  • Barcode and label standards to follow
  • How to assess your label quality
  • Checking what’s printed on your labels
  • Pros and cons of using a basic barcode scanner to assess label barcodes
  • Why you would use a barcode verifier to assess labels
  • The best way to assess label print quality
  • Summary

Read on…

Barcode and Label Standards

For many industries, labels are a critical element in compliance.   

Compliance comes in two forms – the label components (size, material, compliance icons, colours, barcodes and required text) and machine readability (ability to scan barcodes).

Industry label standards.  Different industries will require different label layouts and will specify icons and certain barcodes, containing certain data.  Standards are set by organisations like ODETTE for the automotive sector, FDA regulations for healthcare or EU directives.  The scope of different industry label standards is too wide to cover in this article.  It is your responsibility to research what your industry label standards are.  

Barcode standards.  Barcode standards (for example size and shape, bar width, colours or colour contrast) are set by an international organisation called GS1. 

GS1 is a not-for-profit organisation that issues barcode numbers and coordinates the way barcodes are developed and used in commerce.  It’s an international body that has national offices to provide local help and service.

There are generally two different barcodes used for items at a retail point of sale – GTIN8 and GTIN13.  Both these barcodes have clearly defined standards in terms of size, height and width proportions, white space, colours and contrast and bar widths.

For what are known as traded items, i.e. a box of 12 cereal boxes or a pallet of dishwasher powder, the choice of barcodes extends to ITF14, GS1-128 or GTIN8 and 13. 

For further details on what barcode to use where, when and how – use this great resource from GS1 – Getting it right – guide to barcoding.  It’s a 58 page pdf and helps with all aspects of barcode printing onto packaging.

Once you have taken advice from your industry body, you can finalise the layout and design and check they are compliant.

What needs to be in place is a ‘sign off’ to certify the label has been designed correctly. 

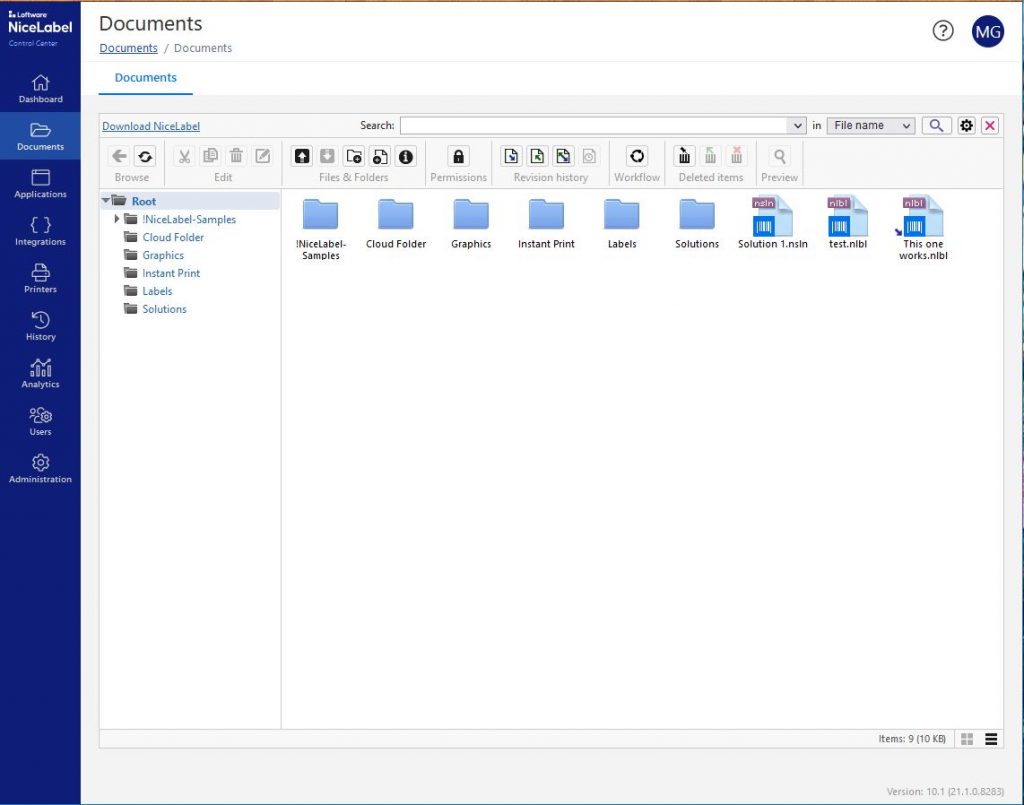
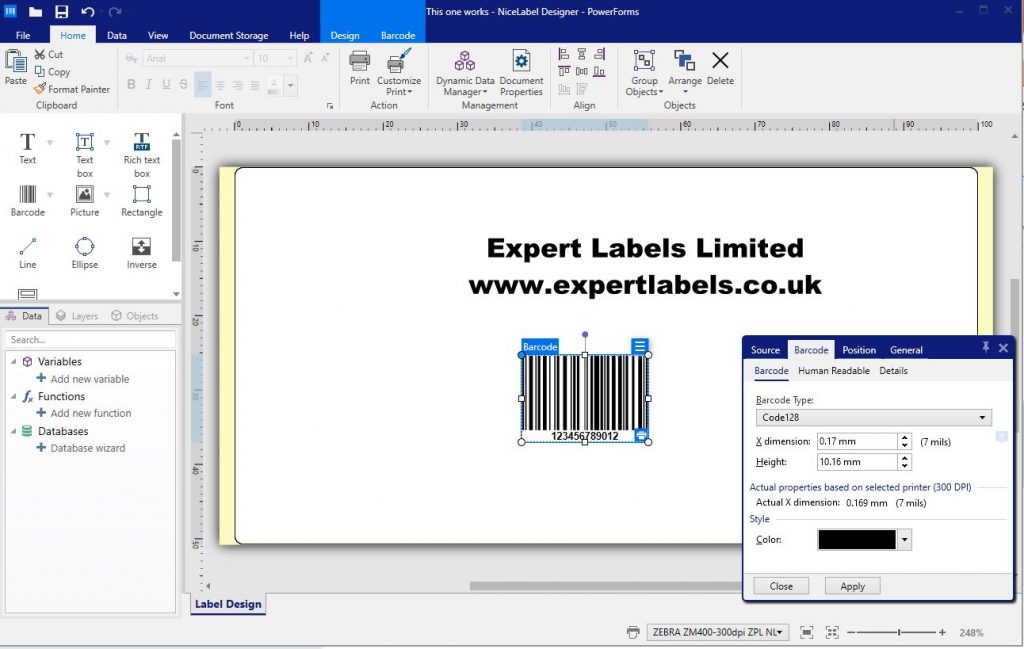
In the case of pharamaceutical labels or other high compliance labels, label design software like the Enterprise Edition of BarTender can be configured to prevent labels being printed unless they have been approved by an authorised person.

Once the layout is approved it’s a matter of ensuring labels are printed correctly and consistently to that standard.

How to Assess Your Label Quality

Production faults with labels show themselves with:

Faulty Labels
Faulty Peel & Reveal Labels
  • Print not staying on the label or fading and becoming unreadable,
  • Adhesives not working – and labels falling off items,
  • Adhesives working too well – and labels not peeling off,
  • Labels you can’t print onto
  • Specific failures such as Peel & Reveal labels failing to ‘reveal’ or failing to shut.
  • Varnishes that are patchy

Faults are usually obvious once the labels are used.  If your labels are critical then it is important to test the labels before use. QA will need to assess each consignment.  Label faults are very rare.  Out of thousands of orders a year we get no more than a couple of faults.

Sometimes label faults might be an inconvenience rather than a failure.  Try to include label performance in your process evaluations. 

If labels are making your processes less than optimal, contact us for help making your labels perform better.

Checking What’s Printed on Your Labels

Variable Label Data

If a label has been designed correctly, the chance of incorrect data being printed on your label or encoded in the RFID chip or barcode is almost nil. 

After a label design, layout and data-content is approved the only other point of failure is the origin of the data. 

If faulty data is added to your organisation’s database, then faulty data will be printed.  Examples of this might be an uncapitalised name on a shipping label.  Another example might the wrong post code.

Another thing to look out for are changes upstream in the database.  A change to a field in a database might show up as incorrect data printed on a label.

Assessing machine readable labels

Machine readable labels, such as barcoded labels or labels with RFID chips embedded in them, need to be assessed first on what data they contain and then secondly – on how well the label meets the barcode or RFID chip’s technical specifications.

1. Scan barcodes with a barcode reader.

This is the simplest, cheapest and least reliable way to check barcodes on your labels.  Contact us for a simple barcode scanner (costs around £100) . 

Here’s the approach – it’s really simple – have a routine where you scan codes at the beginning, end of your print run and as many times inbetween as you can.  If you can’t read your barcode then investigate the problem and re-print if needed. 

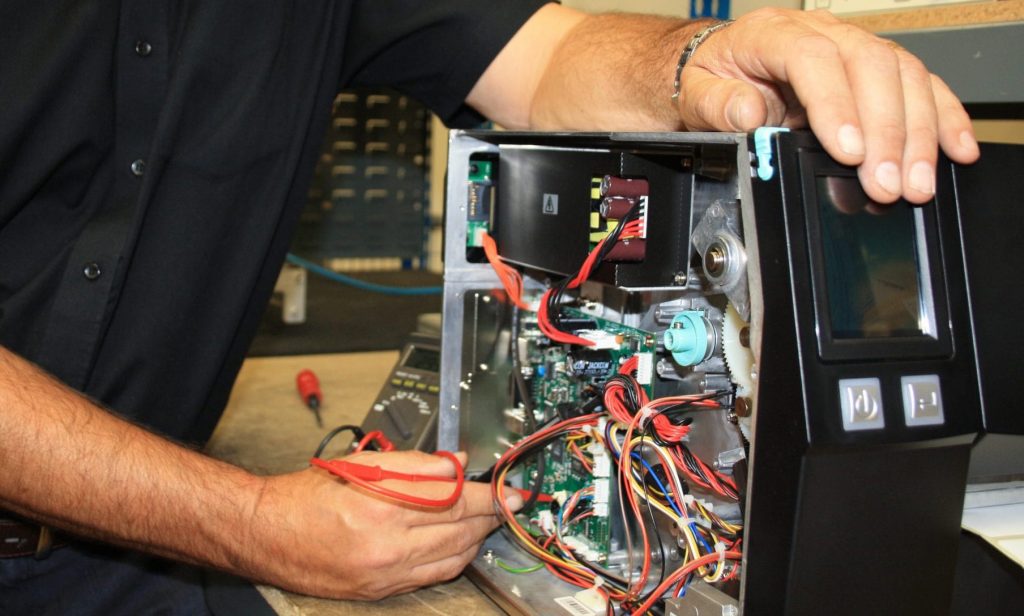
This will pick up faults like a printhead failure but it won’t notice much else. 

The scope of the barcode quality report is Read or Not Read. Not particularly enlightening.

By scanning a sample of codes it won’t notice irregular problems such as where ribbons have wrinkled on a few labels in a large batch of labels.

Barcode scanners vary in quality and performance – so your scanner might read a code, your customer’s might not.  Remember also, your barcodes might be scanned by multiple scanners throughout the supply chain.

Certainly using a phone is not reccomended.  Cameras can read badly damaged barcodes much better than barcode scanners. 

It’s not perfect but it’s a low cost way to check your labels.

This is not a solution in a regulated industry such as pharmaceuticals or healthcare products, where labels need to be perfect. 

2. Using a Barcode Verifier to assess your labels

Axicon 6500 Barcode Verifier
Barcode Verifier

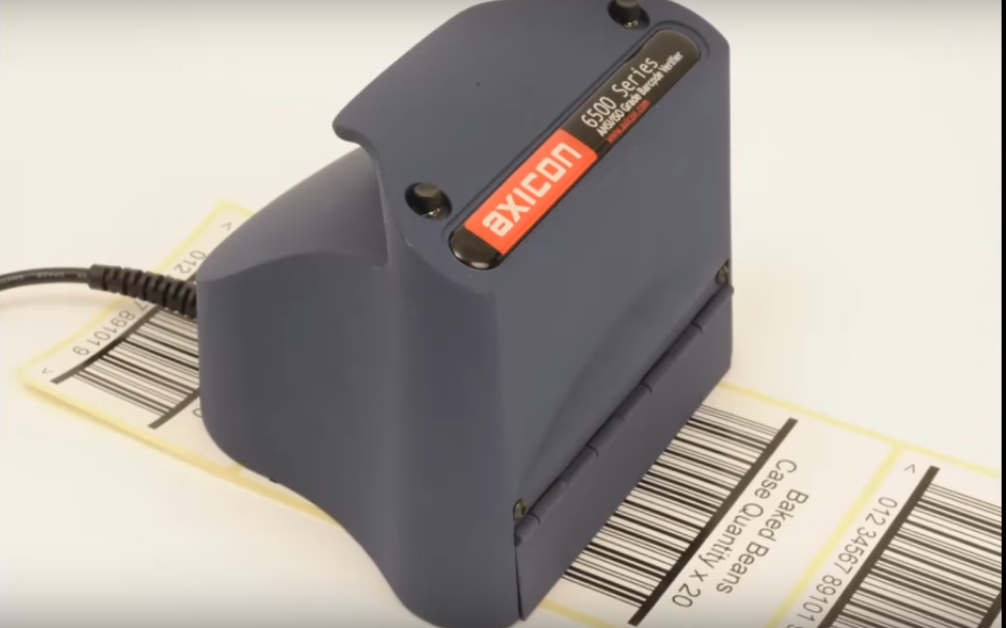
Our previous suggestion was to scan with any old barcode reader and see if it can read.  A much more reliable (and one you could argue in court with) is to use an instrument called a barcode verifier.

A Barcode Verifier is a precision instrument that scans and analyses the barcode, taking into account print quality and barcode layout and composition. 

A barcode verifier is built to assess against the ISO barcode standards – ISO15416 for linear barcodes and ISO15415 for 2D symbols.

By scanning your barcode you will see if the barcode meets standards and importantly, if it doesn’t, you’ll know what needs to be fixed. 

Perhaps more importantly though, you have a record of compliance that you can use in the event of a dispute.

3. Vision Based Inline-Verification for Printed Label Inspection

Inline Verifier
Inline Verifier fitted to a Zebra Label Printer

The best way to check the quality of barcodes and labels in general is to use a camera-based inline barcode verifier.  In-line Verifier means that the camera is fitted onto the label printer and checks the print content and quality of every label printed. This label inspection system is (in our opinion) the best way to ensure the quality of labels.

An inline verifier is the only way a printing fault like this one (below) would be noticed, unless you employ someone to watch every label printed.

Faulty Printed Labels

Vision based label validation – takes an image of every label passing out of the front of the printer.  It compares the image to what is meant to be printed and stops the printer if it encounters a problem.

  • Vision label quality assurance systems check the readability of 1D and 2D barcodes, along with checking they meet GS1 and ISO standards.
  • You can set up thresholds for blemishes – so only significant marks stop the printer. 
  • Identify incorrect text, i.e. if the wrong data is included in the label.
  • Doesn’t slow down the printing process. The printers perform at their usual speed.
  • Uses Optical Character Recognition (OCR) to read the text of the label.
  • Works with the popular printer manufacturers such as Sato, Printronix, Zebra and Honeywell, though it is only compatible with the high-performance printers in the respective ranges.
  • Keeps an audit trail of results.

Sophisticated in-line verifiers can even take data from a spreadsheet or database and ensure labels include data from the database. 

Label Inspection System

Set up is reasonably simple: print a label and have it pass through the verifier.

Using the configuration setting – select areas of the label that will change and tell the software what should appear there.  Set up areas of the label that need to be ignored.

Let it print.

The printer can be fitted with a light tower that shows a red light if the system encounters an error and needs to stop.

A complete vision based label verification systems cost between £20,000 and £25,000 depending on the thermal printer and any additional training or system validations.

Summary

  • Contact your industry body and find out what the labelling standards are.
  • Talk to us about getting your labels designed to meet your industry standard.  That might mean using label design software (if you’re going to print labels yourself) or engaging a graphic designer.
  • Sign off your final label design.
  • Check your labels for quality (such as stickiness or colour) before you need to use them.  Ideally when you receive them.
  • Have a system in place for reporting faulty labels.
  • If you’re printing your own labels, check the labels (including barcodes) contain the correct information – and that the barcodes/RFID chips read correctly at the start and end of each print run.
  • If the consequences of faulty labels are serious, invest in a barcode verifier to assess barcode quality.
  • If the process of assessing labels is too time consuming and costly, invest in a camera based label quality assessment tool that will check every label printed.

Contact the experts for labelling advice.

Useful Links

GS1UK.org – the UK branch of the international barcode standards organisation, GS1.

‘Getting it Right – Guide to Barcoding’ pdf from GS1.

Updated 7 Mar 2021.

Service Options for Your Label Printer

If printing labels is critical to your organisation then you absolutely need on-site support and a partner that you can rely on.  We offer a full range of service options and are available to talk through your specific needs to ensure that you have the right cover at the right price.

Here are some things you need to think about.

  • Onsite maintenance services
  • Return to workshop repairs
  • Hot-swap services
  • Our recommendations on supporting your printers
You need to weigh up the various costs of a repair strategy against a damaging stoppage.

On-Site Maintenance Services

Thermal printer repair

If printing labels is critical to your organisation (for example you need to print shipping or pallet labels every day) then you’ll need to consider on-site support. 

Coverage
 
Brand coverage.  Repair coverage is available for all the major brands of thermal label printers – Zebra, Toshiba TEC, Sato and Datamax – O’Neil (now Honeywell).  Support can also be provided for the lesser-known brands such as Godex and TSC.
 
Geographical coverage.  Levels of printer support are provided across the country – including Scotland and Northern Ireland – although this is not as easy as England and Wales – there may be a delay and increased costs providing an engineer. 
 
On-site service looks like this:
 

Annual Contracts

  • You pay for an annual support contract.
  • Costs depend on the make and model of printer, with wider printers costing more than smaller ones.
  • If your printer is more than a few months old then you pay for an engineer to visit and make a pre-contract inspection.  This inspection includes a basic service.
  • If your printer develops a fault then you call the helpline and a technician will try and get your printer up and running over the phone.  If the printer needs a visit then a visit is booked same day or next day. 
  • The contract covers the engineers time (including travel) and parts, but won’t cover parts damaged maliciously.  It won’t cover consumable parts – i.e. printheads and platen rollers. 
  • There are different levels of cover.  Some cover includes the engineer’s time replacing a printhead, other levels would see you pay the engineers time replacing consumable parts.
  • Some cover includes support for label design software such as Nicelabel and BarTender. 
  • Premium cover also includes an annual maintenance visit where the printers are checked over and any parts that are causing a problem are replaced.

‘Ad hoc’ service

Out of contract support is called adhoc printer support.

  • In the case of an adhoc repair, you call us and we quote you an hourly rate (usually around £80-100 per hour) and give an estimate on the cost of the parts. 
  • The engineer is booked to attend as soon as possible, but with no guarantees.  Contract customers come first.
  • You are invoiced for the cost of parts and the number of hours the engineer spent on the job.
  • If you are located in Scotland – you may need to pay for the engineer’s accommodation.

Return to Workshop Repairs

Mobile Printer Repair Centre

Return-to-workshop or return-to-base repair is, as the name suggests, where a thermal label printer is shipped back to a central repair centre (usually in the UK) where the printer is fixed.

You pay for the workshop time (at a lower rate than on-site service) and parts.

This is the most economic repair option – especially if it’s repaired under a contract bought at the time of buying the printer.

Obviously, returning the printer for repair is going to take longer than an on-site repair. 

Add in the time the courier takes to return the printer and you can find yourself without a printer for seven working days.

If you use a Return to Workshop or Return to Base (RTB) service, you will need an alternative way to print labels whilst the printer is away.

When you have a spare label printer, a return to workshop service is the best option.

Printer Hot Swap Repair Services for Thermal Printers

A hot swap repair is a service where you notify us that you have a faulty printer.  We immediately send you a replacement substitute printer that you can plug in and use the moment you receive it.

For this to work, printer features need to be similar – the ribbons and labels need to be the same dimensions so they fit in the replacement printer.  The interface and the printer operating language need to be 100% compatible otherwise you will need to devote precious time making the new printer work.

What’s usually a problem is if you have an unusual printer.  A printer wider than 110mm wide, a higher resolution printhead or a Radio Frequency ID label encoder. 

Hot swap service needs to be planned in advance so that we can check compatibility and have hardware available.  Contact us for hot swap label printer service for you.

Our Recommendation for Supporting Label Printers

Where Labels are Critical to Your Organisation

Where label printing is business critical – buy a second label printer – but don’t keep it as a standby printer.

Don’t pack the printer away and forget about it. We have clients who do that.

Have both printers in use.  You don’t want to find the printer hasn’t been updated or has a problem when you come to use it.  Two printers working side-by-side will halve the wear and tear on the printers – so they’re less likely to fail.

Make sure your second printer is the same as the first.

Why? Because then it’s interchangeable. The printer operators know how to operate both, the ribbons and labels are compatible and if one printer breaks down, you can switch over in minutes.

Take out extended cover as it’s usually cheapest and includes a printhead – which – if bought separately – would be half the cost of the service contract.

Try This Service Hack with your Thermal Label Printer

Take out extended (and enhanced) warranty when you buy your new thermal label printer.

When (if) the printer breaks down, order an identical printer for next day delivery.

You only buy a new printer if the first one breaks (they are generally very reliable).

Let’s look at some example costings:

On-site Maintenance

Original Printer Price £900
3 x annual contract £1,000

Total cost £1,900

Benefits

Lower cost if you have an unreliable printer.  More convenient – you call and an engineer comes to fix the printer.

Extended Warranty

Original Printer Price £900
Extended 3-year warranty £290

If your printer breaks down:

A new printer £900

Total cost £2,090

Benefits

You only buy a spare printer if you need it.
You have a spare printer.
If your printhead fails it’s repaired free of charge.

Risks

You might find there isn’t a replacement printer available next day.

Updated: 20 April 2021